


Next: Intersection test suite
Up: Traffic flow characteristics
Previous: Short discussion
Contents
In transportation simulation models for larger scale questions such as
planning, the flow characteristics of the traffic dynamics are in some
sense more important than the microscopic driving dynamics of the
vehicles itself. This becomes especially true since a ``complete''
representation of human driving is impossible anyway, both due to
knowledge constraints and due to computational constraints. Yet,
calibrating a traffic simulation model against all types of desired
behavior (for example against all HCM curves and values mentioned in
this paper) seems a hopeless task given the high degrees of freedom.
Transims thus attempts to generate plausible emergent macroscopic
behavior from simplified microscopic rules. This paper
described the more important aspects of these rules as currently
implemented or under implementation in TransimsBefore we implement
rules in the Transims production version, we usually try to run
systematic studies with more experimental versions. The results of
the traffic flow behavior from that study were presented. Also, we
showed the effects of some changes in the rules for the example of a
yield sign. Finally, some comparisons were made between the logic
currently under implementation and the logic used for the Dallas/Fort
Worth case study.
One problem with microscopic approaches is that, in spite of all
diligence, subtle differences between design and actual implementation
can make a significant difference in the emergent outcome. For that
reason, this paper should also be seen as an argument for a
standardized traffic flow test suite for simulation models. We
propose that simulation models, when used for studies, should first
run these tests to demonstrate the dynamics of their emergent
macroscopic flow behavior. We think that the combination of results
presented in Figs. 32.2 to 32.5 are a good
test set, although extensions may be necessary in the future (e.g. merge lanes, weaving, etc.). We will attempt to provide future
Transims results also with updated versions of the results of the
traffic flow tests.
Figure:
(a) Definition of  and examples for one-lane update rules.
Traffic is moving to the right. The leftmost vehicle accelerates to
velocity 2 with probability 0.8 and stays at velocity 1 with
probability 0.2. The middle vehicle slows down to velocity 1 with
probability 0.8 and to velocity 0 with probability 0.2. The right
most vehicle accelerates to velocity 3 with probability 0.8 and stays
at velocity 2 with probability 0.2. Velocities are in ``cells per
time step''. All vehicles are moved according to their velocities at
a later phase of the update.
(b) Illustration of lane changing rules. Traffic is moving to
the right; only lane changes to the left are considered. Situation I:
The leftmost vehicle on the bottom lane will change to the left
because (i) the forward gap on its own lane, 1, is smaller than its
velocity, 3; (ii) the forward gap in the other lane, 10, is larger
than the gap on its own lane, 1; (iii) the forward gap in the target
lane is large enough:
and examples for one-lane update rules.
Traffic is moving to the right. The leftmost vehicle accelerates to
velocity 2 with probability 0.8 and stays at velocity 1 with
probability 0.2. The middle vehicle slows down to velocity 1 with
probability 0.8 and to velocity 0 with probability 0.2. The right
most vehicle accelerates to velocity 3 with probability 0.8 and stays
at velocity 2 with probability 0.2. Velocities are in ``cells per
time step''. All vehicles are moved according to their velocities at
a later phase of the update.
(b) Illustration of lane changing rules. Traffic is moving to
the right; only lane changes to the left are considered. Situation I:
The leftmost vehicle on the bottom lane will change to the left
because (i) the forward gap on its own lane, 1, is smaller than its
velocity, 3; (ii) the forward gap in the other lane, 10, is larger
than the gap on its own lane, 1; (iii) the forward gap in the target
lane is large enough:
 ; (iv) the backward gap is large enough:
 . Situation II: The second vehicle
from the right on the right lane will not accept a lane change because
the gap backwards on the target lane is not sufficient.
(c) Value of
. Situation II: The second vehicle
from the right on the right lane will not accept a lane change because
the gap backwards on the target lane is not sufficient.
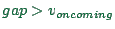
(c) Value of  when in wrong lane during the approach to
the intersection.
(d) Example of a left turn against oncoming traffic. The turn
is accepted because on all three oncoming lanes, the gap is larger or
equal to three times the first oncoming vehicle's velocity.
(e) Test networks.
when in wrong lane during the approach to
the intersection.
(d) Example of a left turn against oncoming traffic. The turn
is accepted because on all three oncoming lanes, the gap is larger or
equal to three times the first oncoming vehicle's velocity.
(e) Test networks.
![\includegraphics[width=0.48\hsize]{gz/97-001.eps.gz}](img827.png)
(a)
![\includegraphics[width=0.48\hsize]{gz/97-002.eps.gz}](img828.png)
(b)
![\includegraphics[width=0.48\hsize]{gz/97-003.eps.gz}](img829.png)
(c)
![\includegraphics[width=0.48\hsize]{gz/97-004.eps.gz}](img830.png)
(d)
![\includegraphics[width=0.7\hsize]{gz/97-005.eps.gz}](img831.png)
(e)
|
Figure:
One-lane traffic: Flow vs. density, travel velocity vs. flow, and
travel velocity vs. density.
|
|
Figure:
Three-lane circle: Flow vs. density, travel velocity vs. flow,
travel velocity vs. density, lane usage vs. flow, and land usage
vs. density. The asymmetry in the lane usage at low densities is due
to the fact that the parking locations start filling in vehicles on
the right lane, and they only move to the left when traffic on the
right lane becomes dense.
|
|
Figure:
of vehicles going through the intersection and number
of vehicles ``off plan'' ( ) per green phase, re-scaled to hourly
flow rates per lane.
) per green phase, re-scaled to hourly
flow rates per lane.
|
|
Figure:
through stop sign, yield sign, and unprotected left turn. Left
column: Major road (``circle'') has one lane. Right column: Major
road (``circle'') has two lanes. Solid line: Highway Capacity
Manual (114).  , gap acceptance rule is
``accept if
, gap acceptance rule is
``accept if
 , and if first site on target
lane available''. Note that for ``left turn across two lanes''
(bottom right) the opposing volume is the sum of both lanes, i.e. twice the value shown on the x-axis.
, and if first site on target
lane available''. Note that for ``left turn across two lanes''
(bottom right) the opposing volume is the sum of both lanes, i.e. twice the value shown on the x-axis.
|
|
Figure:
Comparison between different rules for the case of a 1-lane minor road
controlled by a yield sign merging into a 1-lane major road.
(a) Same as Fig. 32.5 (i.e. and ``accept if
''), except
that traffic on major road does not reserve the first cell on the
outgoing link, thus giving traffic from the yield sign more
opportunities. Note that this seemingly small difference has big
consequences in the congested regime. (b) Same as (a) except
that acceptance rule now ``accept if
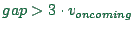 ''.
(c) Same as (b) except that
''.
(c) Same as (b) except that  . (d) Same as
(b) except that
. (d) Same as
(b) except that  . (e) Same as (b) except that
acceptance rule now ``accept if
. (e) Same as (b) except that
acceptance rule now ``accept if
 . (f) Same
as (b) except that acceptance rule now ``accept if
. (f) Same
as (b) except that acceptance rule now ``accept if  ''.
''.
|
|
Figure:
between the March 1998 Transims microsimulation gap
acceptance logic and the one used in the case study. Flow through
stop sign, yield sign, and unprotected left turn into/across traffic
on major road. Left column: March 1998 Transims microsimulation.
Right column: case study Transims microsimulation. The arrows in the
left turn case indicate the direction of increasing congestion. - The
results are not strictly comparable because (i) the simulations in the
right column were run with a maximum speed of cells/update
(135 km/h) vs. cells/update (81 km/h) in the left column
(mostly noticeable in the lower maximum flow on the major road); and
(ii) the stop and yield cases on the right describe flow into a 3-lane
road vs. flow into a 1-lane raod in the left column. Note that the
results for the turns into other traffic (``stop'' and
``yield'') are not that much different between the two whereas the
result for the turns across other traffic (``left turn'')
leads to much higher flows in the uncongested and lower flow in the
congested regime with the case study logic.
|
|
Next: Intersection test suite
Up: Traffic flow characteristics
Previous: Short discussion
Contents
2004-02-02
![\includegraphics[width=0.45\hsize]{gz/free1.eps.gz}](img832.png)
![\includegraphics[width=0.45\hsize]{gz/free1-vel-flow.eps.gz}](img833.png)
![\includegraphics[width=0.45\hsize]{gz/free1-vel.eps.gz}](img834.png)
![\includegraphics[width=0.45\hsize]{gz/free3.eps.gz}](img835.png)
![\includegraphics[width=0.45\hsize]{gz/free3-vel-flow.eps.gz}](img836.png)
![\includegraphics[width=0.45\hsize]{gz/free3-vel.eps.gz}](img837.png)
![\includegraphics[width=0.45\hsize]{gz/free3-usage-flow.eps.gz}](img838.png)
![\includegraphics[width=0.45\hsize]{gz/free3-usage-dens.eps.gz}](img839.png)
![\includegraphics[width=0.5\hsize]{gz/ps_t-intersec.eps.gz}](img181.png)
![\includegraphics[width=0.45\hsize]{gz/stop1.eps.gz}](img840.png)
![\includegraphics[width=0.45\hsize]{gz/stop2.eps.gz}](img841.png)
![\includegraphics[width=0.45\hsize]{gz/yield1.eps.gz}](img842.png)
![\includegraphics[width=0.45\hsize]{gz/yield2.eps.gz}](img843.png)
![\includegraphics[width=0.45\hsize]{gz/left1.eps.gz}](img844.png)
![\includegraphics[width=0.45\hsize]{gz/left2.eps.gz}](img845.png)
![\includegraphics[width=0.45\hsize]{gz/ge3v.eps.gz}](img186.png)
![\includegraphics[width=0.45\hsize]{gz/gt3v.eps.gz}](img185.png)
![\includegraphics[width=0.45\hsize]{gz/vmax5.eps.gz}](img846.png)
![\includegraphics[width=0.45\hsize]{gz/vmax2.eps.gz}](img847.png)
![\includegraphics[width=0.45\hsize]{gz/gap-gt-v.eps.gz}](img848.png)
![\includegraphics[width=0.45\hsize]{gz/gap-gt-vmax.eps.gz}](img849.png)
![\includegraphics[width=0.45\hsize]{gz/stop1-cp.eps.gz}](img850.png)
![\includegraphics[width=0.45\hsize]{gz/cs-stop.eps.gz}](img851.png)
![\includegraphics[width=0.45\hsize]{gz/yield1-cp.eps.gz}](img852.png)
![\includegraphics[width=0.45\hsize]{gz/cs-yield.eps.gz}](img853.png)
![\includegraphics[width=0.45\hsize]{gz/left1-cp.eps.gz}](img854.png)
![\includegraphics[width=0.45\hsize]{gz/cs-left.eps.gz}](img855.png)